

GA4 email tracking reports are not available out-of-the-box. But marketers like you and me can set them up really quickly using this guide. It takes just 5 easy steps using GA 4’s new Explore feature – and you can build an effective and informative email performance report in no time.
1. Why Track Emails in GA4
There are plenty of good reasons to track your Email channel performance through your web analytics tool – here are just a few:
- One-stop reporting for all your channels gives you the full picture of your digital marketing performance versus having disparate reports across different platforms.
- Checking what happens after the click – how email really creates value for your company through engagement, conversions, or actual purchases is best done via a tool like GA4.
- Your analytics tool can do so much more than that though – including helping you to identify all touch points across the customer journey and providing demographic info, so you can get a better picture of your audiences and drive better personalization.
2. What Do We Need to Build GA4 Email Tracking Reports
There are a couple of must-do components that are prerequisites to building effecting email reporting in Google Analytics 4.
Part of your overall digital marketing tracking strategy:
Email needs to be a part of your overall digital link tracking strategy, because even though it is considered “owned” media, you still require tracking codes to all your email links.
This is because your marketing emails are being sent out of a 3rd party platform, like Mailchimp, HubSpot, and Marketo.
Once you have aligned email tracking requirements and required UTM tracking codes, you are ready to prepare your emails for successful GA4 reporting. Let’s get started:
UTM_medium=email:
Establish tracking link templates for your emails with utm_medium = email being a must-have requirement.
Email UTM_source:
Your links also need a utm_source code, which could be “newsletter”, “onboarding-series”, “upsell” or whatever the name of your email sub-chanel is.
Email UTM_source_platform:
If you are implementing email through various platforms – for example, hubspot for marketing emails, salesforce for sales emails, and paid emails through 3rd party vendors, you need to add to your tracking the new GA4 UTM dimension, called utm_source_platform.
Email Subject Line:
For better reporting, we recommend to add your subject line as a component to your UTM_Campaign.
Email UTM_Campaign:
We recommend to include the Campaign Category (acquisition, conversion, upsell, etc.), Campaign name (your yearly, quarterly, or ad-hoc campaign), subject line, and date send.
Your utm_campaign format should like this: utm_campaign={campaign_category}-{campaign-name}-{subject-line}-{date-start}
If you have multiple product lines and brands, you might need to augment your utm_campaign architecture to align with the goals of your overall link tracking strategy.
Email UTM_Content:
Add the asset that you are promoting. Though content is a simple dimension, with so many asset varieties across different channels, you might consider adding {brand}, {product-name}, {document-type} and other more granular details.
Email UTM_Term:
UTM_Term is best positioned to give you intelligence on the type of links that audiences prefer – button links, regular text links, image links, etc. If you have two of the same URL links, it also makes sense to identify where they are places – in the header, body, or footer, so that you can see which links does the best job in terms of gathering clicks.
3. Prepping Email Tracking Links: Making It SIMPLE
Looking at everything you need to be able to track email performance in GA4, you might feel that this is way too complicated. But it isn’t. Actually it’s quite easy with the right organization and tools.
Automate – tag your email links in one go
You can use CampaignTrackly‘s Chrome or Edge extensions for an automated in-bulk processing of your email links. We give you minimal copy-pasting and mostly click, drag & go experience. What is more, you can be rest assured that all potential errors associated with copy-pasting are eliminated as well.
Watch this brief video to see how you can effortlessly build email tracking links and save time – our extensions support Mailchimp, HubSpot, Marketo email editors, and more:
Use tracking templates to boost productivity and eliminate errors
If you are using CampaignTrackly, you can leverage our Tracking Template feature that allows you to pre-set a combination of Tag groups and tags and save them as a template. This is a great way not only to save you time, but to also make sure you are not missing a critical tag group and you are keeping all your links consistent.
Most importantly – you set it once, and… “forget it”. All users need to do is click our extension while they are building the email, select the relevant template, and add UTM codes to all their links in a few easy steps.
4. Set up Your GA4 Report in 5 Easy Steps
Step 1: Go to the EXPLORE Feature in GA4
You will need to click the “Blank” exploration report to get started. Once you open up your empty exploration, you will see that it has three sections – Variables, Tab Settings, and The Visualization report itself. You can add various tabs to this report to group your stats in different ways.
Step 2: Name the Report & Create an Email Segment
Name
In the Variables>Exploration Name, I have named my report “Email Campaign Traffic”, but you can choose whatever title is appropriate for your organization and objectives.
Date
Selecting a date range is important, so make sure you cover a relevant period of time that has data. If you select a date range that has no email trackable link data, you will see an empty screen on the right.
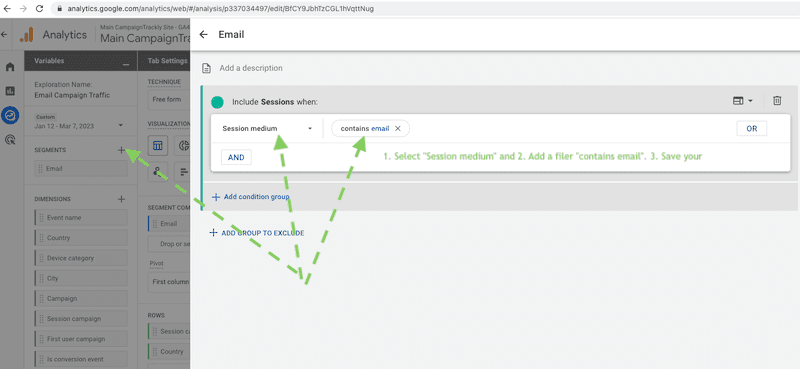
Segment
Clicking the “+” sign on segments opens the segmentation window where we will ask GA4 to only show us website visits with utm_medium=email. In my report, I selected “Session medium contains email”. Here is how it looks like:
Step 3 – Add Relevant Dimensions
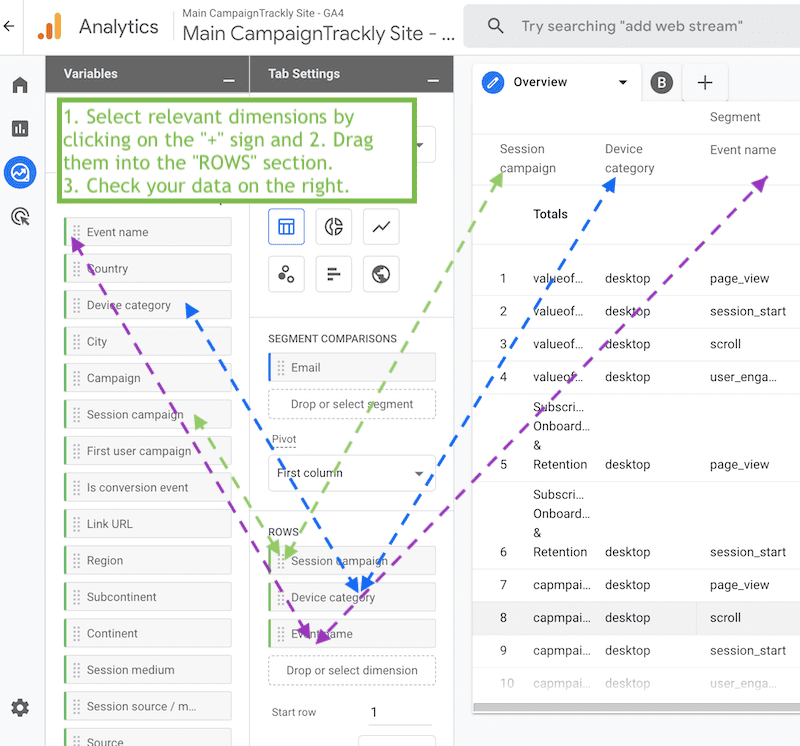
Selecting how many dimensions you want to see in the report is up to you – I added three, just to provide you with a meaningful example. Note that the dimensions you select in the Variables section are added to Tab Settings>ROWS.
GA4 gives you a large number of dimensions, including eCommerce stats that are especially helpful to marketers who send eCommerce emails meant to generate revenue.
Here is another, simpler example, where we only have Session Campaign and Country as reporting dimensions:
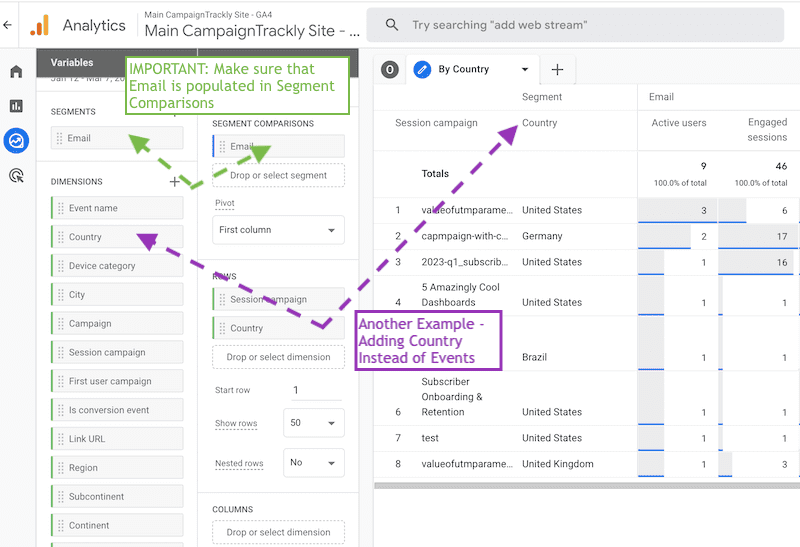
Make sure to check that Variables>SEGMENTS>Email is also populated in your Tab Settings>SEGMENT COMPARISONS section.
Step 4 – Add Relevant Metrics
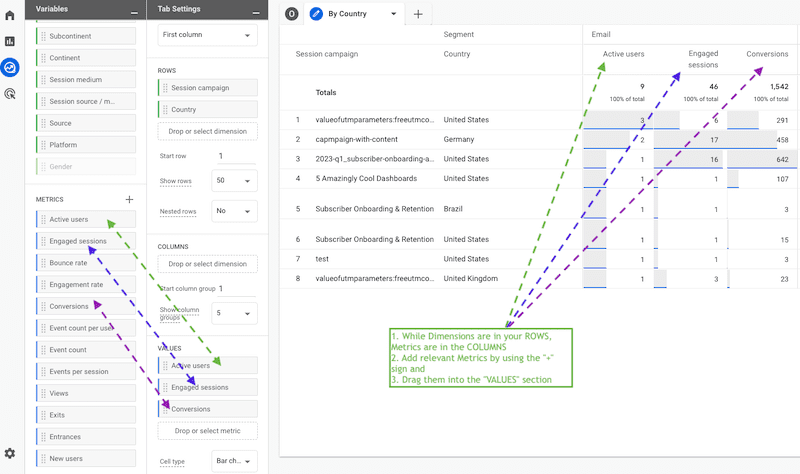
While your dimensions are in your Tab Settings>ROWS, metrics will populate the Tab Settings>VALUES section of your columns.
Step 5 – You Are Done with Your Email Report
Now you can start playing with different dimension and metric combinations and add specific stat combinations in a number of tabs, depending on our reporting needs.
You can take things a step further and compare your email segment against other segments as well.
Conclusion
In this blog, I shared with you how to build an Email Tracking Report in GA4 – in 5 easy steps. While these reports are not available out-of-the-box, Google has made it fairly easy to build reports using its new Exploration feature. And the best thing? It only takes setting up your first report – you can then clone it and use it as a foundation to build all your other reports.
Do you want to build a best-in-class link tracking strategy that drives digital ROI?
Find out how our platforms works to make things easier for you while saving you time and minimizing reporting errors.


