

Marketo offers great landing page templates that have all the awesome elements a landing page should have.
The platform provides all sorts of templates that combine both visually and functionally attractive elements, including paragraph-only, combined image + paragraph/bullets, form, video, multi-image modules and more.
The greatest treat is that all their landing pages are responsive, well tested and built to perform quite well across browsers in terms of compatibility.
One thing though that Marketo landing pages lack out-of-the-box is the ability to have “animated” banners or dynamic banner slideshows.
In this blog I am going to show you how to do just that – add an animated banner slideshow in 5 easy steps. I will also provide you with all the codes you need to implement it on your platform.
To manage expectations, here is an animated gif that shows what we are trying to achieve at the end of our exercise:
Step 1 – Duplicate and Existing Landing Page Template
Let’s go to Design Studio, open the landing page templates folder and clone one of the generic Marketo guided templates. Let’s save the new LP template as “LP Template with Dynamic Slideshow” or a name of your choice.
Step 2 – Comment out section 4 of the template.
I would like to recommend to comment out or remove your section 4 to avoid having to add new Marketo IDs and names to the elements that we are duplicating – because we will be reusing some of the section 4 code in order to save time and simplify this exercise. If you want to keep your section 4 intact, then – when you paste the slideshow code, Marketo will ask you to add unique IDs to some of the elements. Make sure you rename them appropriately to be able to validate and approve your template.
Step 3 – Replace your Banner section code with the one you download here.
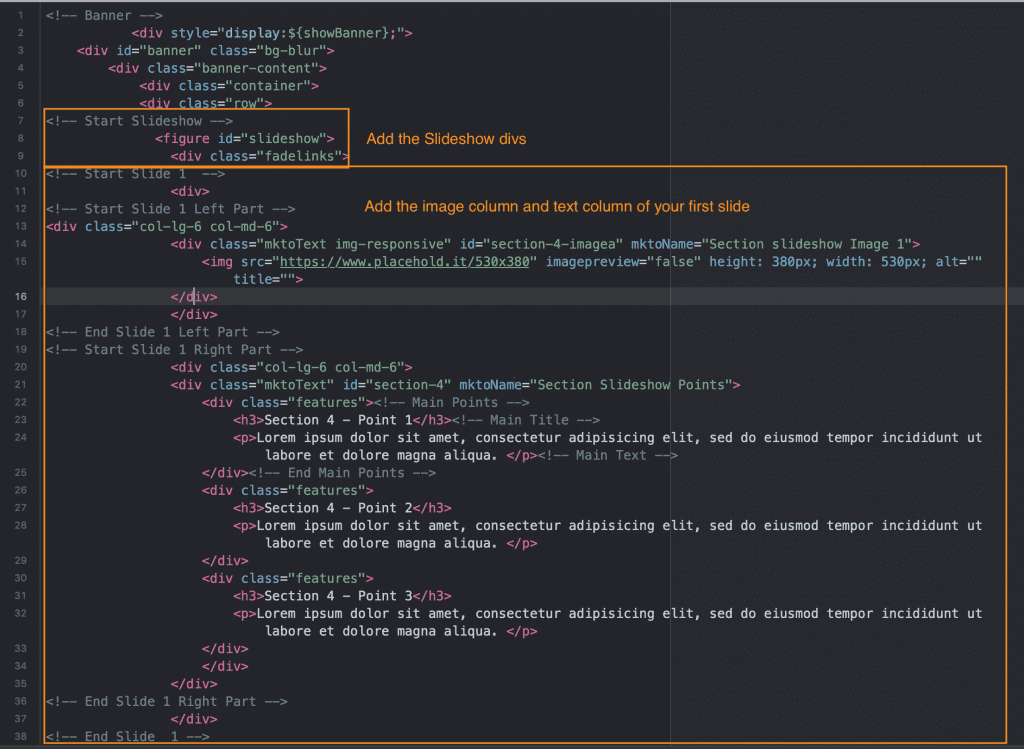
As a next step, you can download the slideshow code that I have attached at the end of this blog and use it to replace everything between and including the “Banner/End Banner” comments. I will now go over the code step by step, because even though it looks intimidating, it is actually a very simple setup that anyone with basic HTML kowledge can do.
- The “Start Slideshow/End Slideshow” comments contain everything that you will need for 2 rotating slides. You can add more slides by duplicating the code for either Slide 1 or Slide 2 and pasting it in the order in which you want them to appear.
- I have conveniently provided a lot of comments to help you identify each relevant section in the slideshow code.
- Please note, outside of a small CSS styling section and a tiny Javasctipt snippet, you really don’t need to add anything else to have a nicely functioning slideshow.
Step 4 – Add CSS styling rules for your slideshow
Your slideshow will live in these two boxes: “figure id=”slideshow” and “div class=”fadelinks””. Please see lines 7 and 8 in the image above to find them in the code.
Since Marketo does not have these elements, naturally it will not have any styling for your slideshow, so you will have to add some rules to the template to make this work.
- Below is all the basic css styling that you will need to have a nicely looking slideshow in the Banner Section of your template.
- Depending on what your best practices are you can either put it in the “<style>” portion of your template or add as a separate file.
- Please note – you can edit the minimum height of your slides to meet your banner height requirements by editing the fadelinks min-height value.
- If you prefer to save the rules in a separate css file, upload the file in Marketo, copy its url and add it using this code:
<link href="https://yourmarketodomain.com/rs/your-account-id/images/dynamic-slideshow-styles.css" rel="stylesheet">- If you would rather keep the styling inside the template, feel free to add it in the “<style>” section together with the rest of the styling rules.
/* Banner Section */
* {
margin: 0;
padding: 0;
}
/* makes your slider images responsive */
img {
max-width: 100%;
}
/* clears the floats */
#slideshow:after {
content: "";
display: table;
clear: both;
}
/* helps ensure non-active slides are not shown */
#slideshow img {
float: left;
margin: 0 -100% 0 0;
}
/* defines the position of the slides */
.fadelinks { position:relative; min-height:380px; width:auto; }
.fadelinks > *{ position:absolute; left:0; top:0; display:block; }
Step 5 – Add a bit of a script that will actually tell the slides to move
Make sure you add the simple code below either on your template or as a separate file, which is named appropriately and linked to your template – for example: “dynamic-slideshow.js”.
Before the closing brackets of the code below, you will see the number “5000” – it governs how fast your slides will be changing. Feel free to experiment with the speed to meet your requirements.
$(function(){
$('.fadelinks > :gt(0)').hide();
  setInterval(function(){
    $('.fadelinks > :first-child').fadeOut()
     .next().fadeIn().end()
     .appendTo('.fadelinks');
  }, 5000);
});
Step 6 – You are ready to go
These are all the elements you have to add in order to have a simple but stylish banner slideshow on a Marketo page. Now you can safely save your template and proceed to creating new pages with it.
I hope that the above quick tut is useful and will help you make many pretty landing pages using Marketo.
Thank you for your time and as promised, here is the code that you can download by clicking on this link.
This blog covers Marketo tips, Marketo landing pages, Marketo slideshows, Marketo banner slideshows, Marketo dynamic images


